Creating Your First App
ShipEngine Connect CLI provides you with everything you need to get started with your integration application.
Using the CLI
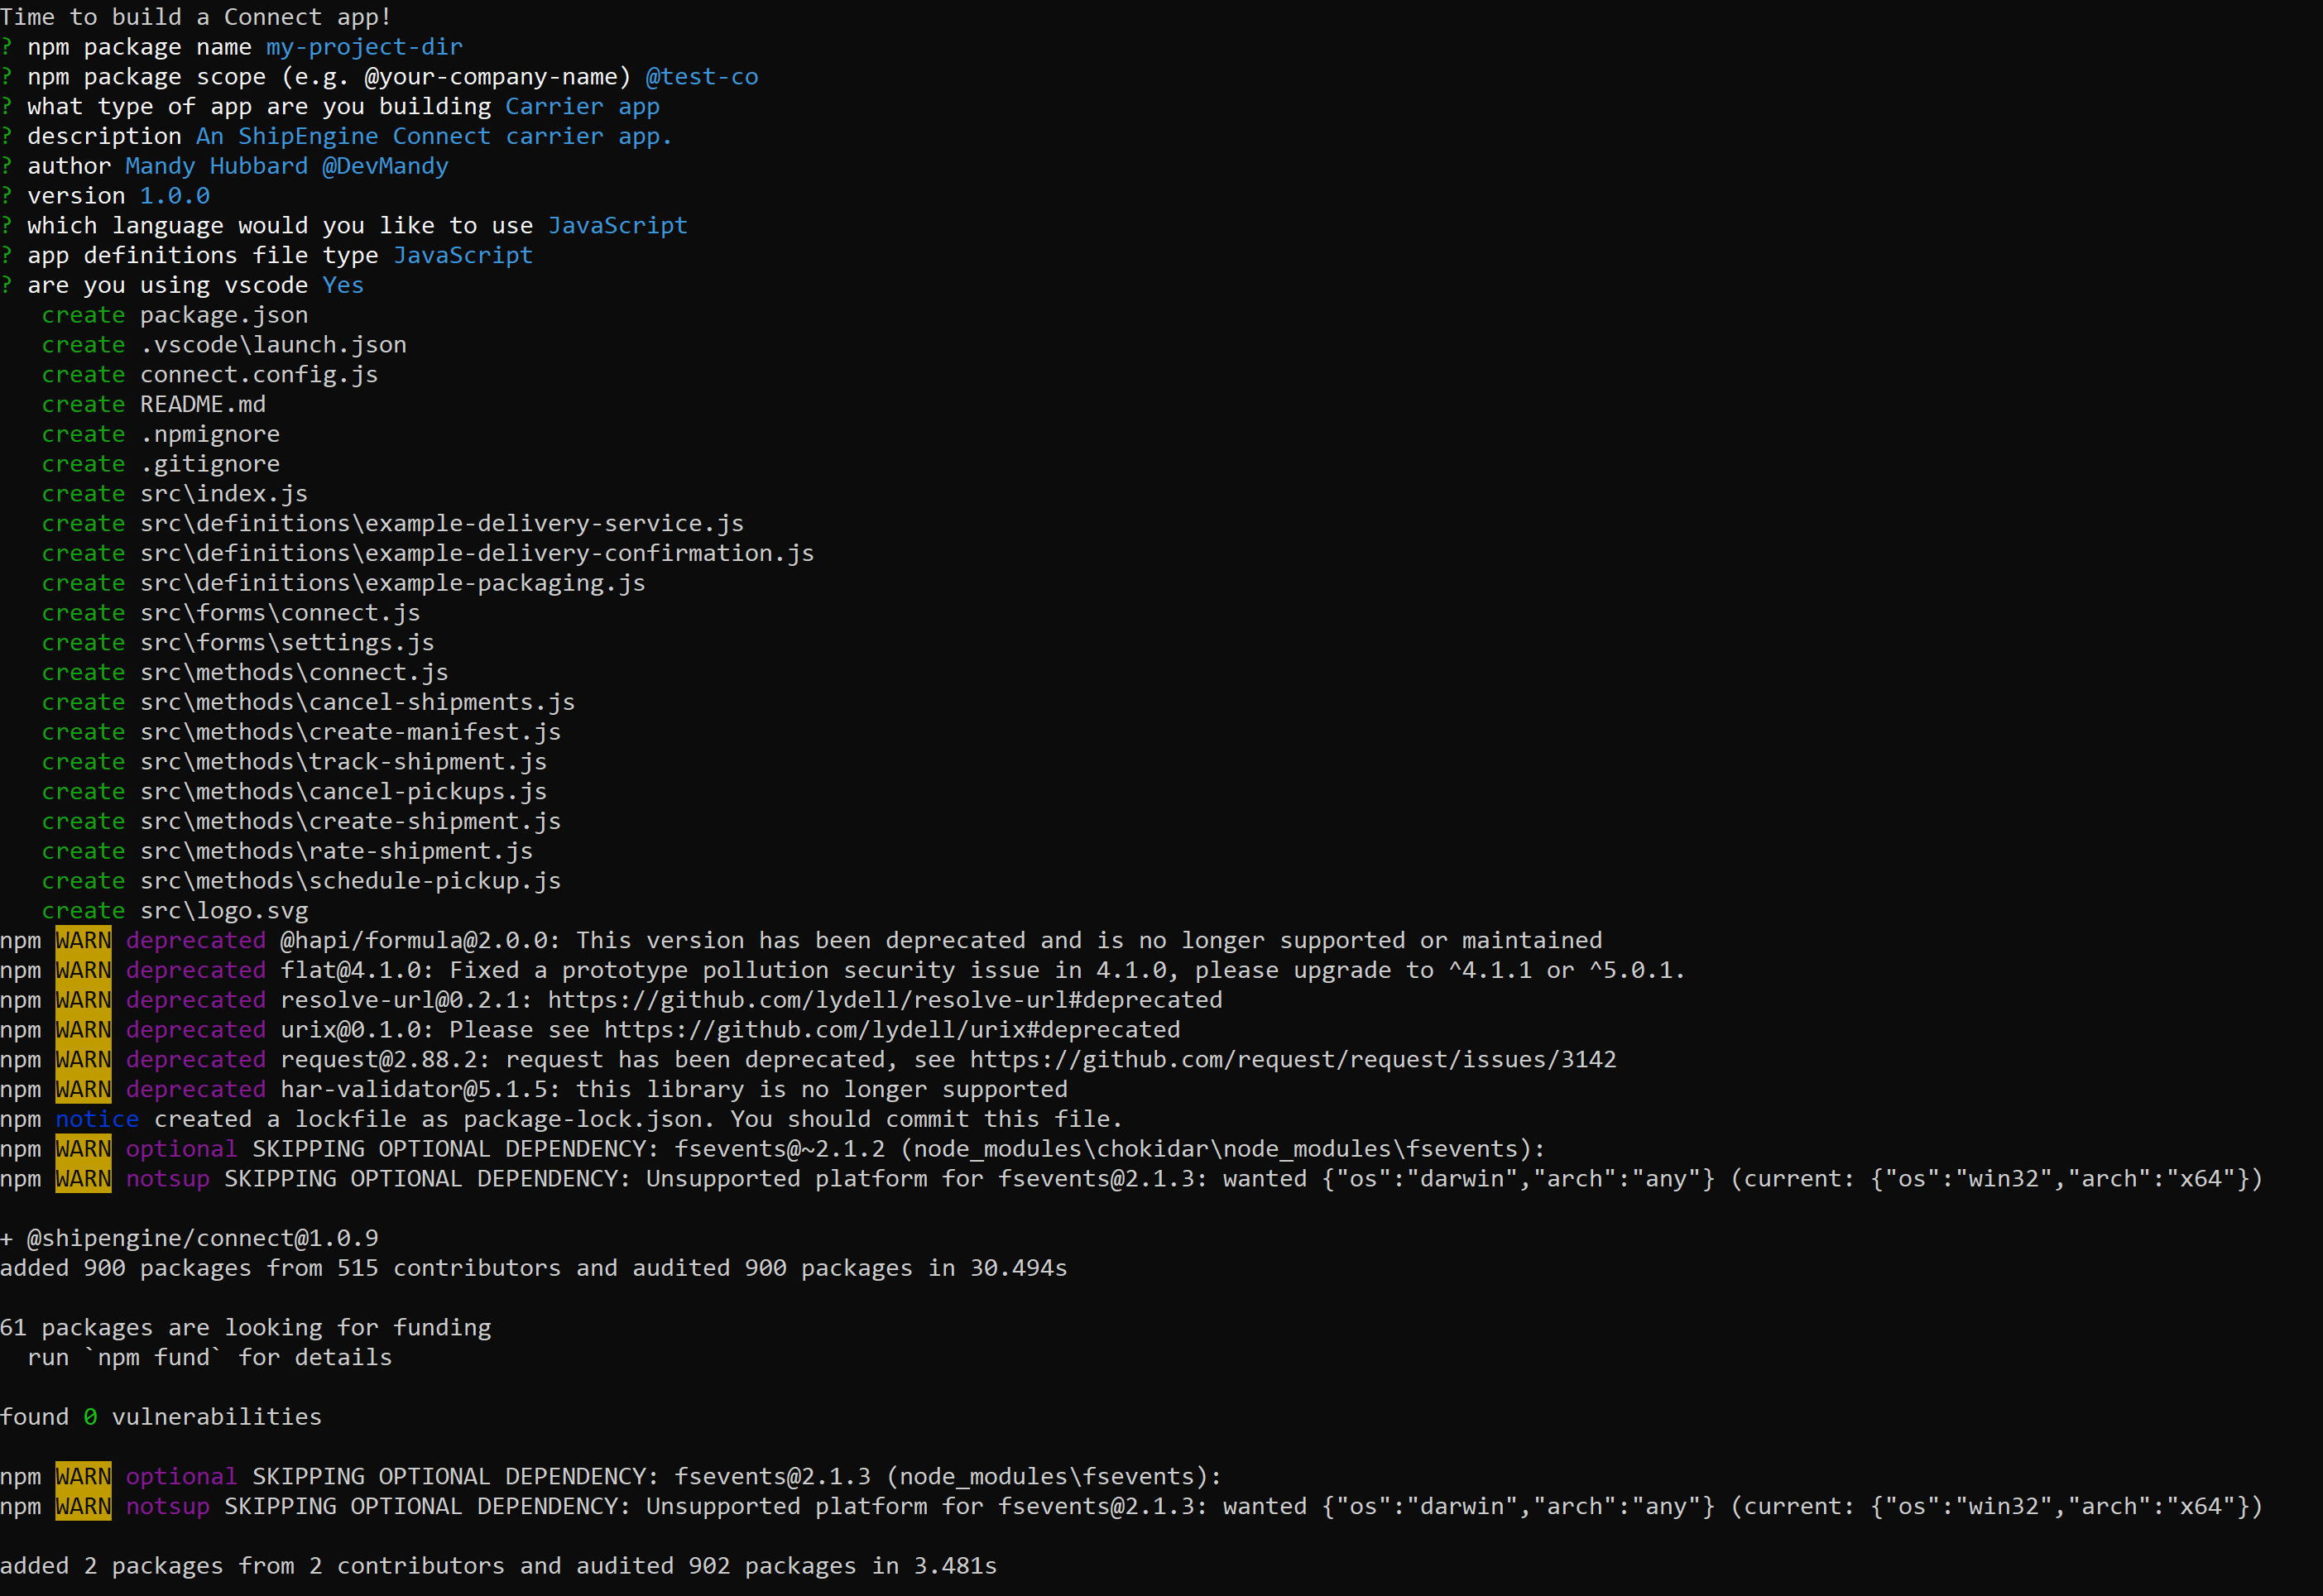
To create a new project, open a terminal on your computer and navigate to the directory where you would like to add your new project by running the following command:
cd my-project-directoryRun the following command:
connect initEnter the npm package name you would like to give your application. The default value is the name of the directory in which you ran the command. Type a new value for the name or press
Enterto accept the default name.Enter the npm package scope you would like to give your application. In most cases, you should use your company name (e.g.
@your-company-name)Use the arrow keys to select whether you want to create a Carrier App or Order App, then press
Enter.Enter a description for your application, and press
Enter.Enter a value to be used in the author property of your
package.jsonfile. If you are logged into GitHub in the terminal from which you ran the command, your GitHub user information will be populated as the default. Type a new author value, or pressEnterto accept the default.Enter a value to be used in the version property of your
package.jsonfile. This value defaults to1.0.0. PressEnterto accept the default value, and then update this property in yourpackage.jsonfile anytime you publish your application.Use the arrow keys to select either
JavaScriptorTypeScriptas your language and pressEnter.Use the arrow keys to select
YAML,JSON,JavaScript, orTypeScriptfor your definition files. Note that you can use a combination of these options when you populate your definition files. This command will create them in the specified format, but you can change them before publishing your application.Type
YorNto indicate whether or not you are using Visual Studio Code for your development environment and pressEnter. When you use VS Code, ShipEngine Connect CLI provides you with a debug command in the scripts section of yourpackage.jsonfile and generates a.vscode/launch.jsonfile to faciliate debugging.
Your Application
All done! You now have the application structure laid out, and you are ready to provide the implementation.
Methods
In the src/methods directory, you will find a file for each method that can be implemented by the application type you selected. Each file
contains a stubbed out method in the language you specified when you ran the command. It contains comments to remind you of the steps
required to implement each method. You aren't required to maintain this directory structure. You
can choose to implement all your methods in one file or choose a different directory structure. As long as your application definition
specifies the path to a file that exports the method, the structure is up to you. This is an example of the method stub that is generated for the createShipment method of a Carrier Application.
"use strict";/** * Generates a shipping label and tracking number for a shipment * * View documentation here: * https://connect-v1.shipengine.com/docs/reference/methods/create-shipment * * View sample implementation here: * https://github.com/ShipEngine/connect-samples/blob/master/freightco/carrier/create-shipment.js */async function createShipment(transaction, shipment) { throw new Error("NotImplementedError"); // STEP 1: Validation // STEP 2: Create the data that the carrier's API expects // STEP 3: Call the carrier's API // STEP 4: Create the output data that ShipEngine expects}module.exports = createShipment;import { NewShipment, ShipmentConfirmation, Transaction } from "@shipengine/connect";import { Session } from "./session";/** * Generates a shipping label and tracking number for a shipment * * See an example implementation below * https://github.com/ShipEngine/connect-samples/blob/master/parcel-post/carrier/src/methods/create-shipment.ts */export default async function createShipment( transaction: Transaction<Session>, shipment: NewShipment,): Promise<ShipmentConfirmation> { throw new Error("NotImplementedError"); // STEP 1: Validation // STEP 2: Create the data that the carrier's API expects // STEP 3: Call the carrier's API // STEP 4: Create the output data that ShipEngine expects}Definitions
In the src/definitions directory, you will find a sample file with the required properties for each type of definition you can provide for your application. For example,
in a Carrier Application, you may provide one or more definitions for the following: delivery service, delivery confirmation,
and packaging.
As with methods, you aren't required to maintain this directory structure. As long as your application definition specifies the correct paths to the definitions you want to include, you can organize your files however you'd like.
In addition to the definitions for the services that are offered, running this command creates a sample application definition as well. It uses the values you provided when you ran the command along with some default values. This definition resides in an index file in the
src directory. You can change the location of this file as long as you provide the correct path to it in your package.json file.
WARNING Once you have published your app, you must not change the
id,name, orcodeproperties for any of your definitions.
This is an example of the application definition that is generated for a Carrier Application.
module.exports = { id: "bd45f17d-e32f-43d0-b397-d627bf0dbfa5", name: "@shipengine/cargo-inc", description: "ShipEngine Connect application for cargo-inc carrier services.", websiteURL: "https://example-carrier.com", logo: "./logo.svg", icon: "./icon.svg", manifestLocations: "single_location", manifestShipments: "explicit_shipments", cancelPickups: "./methods/cancel-pickups.js", cancelShipments: "./methods/cancel-shipments.js", createManifest: "./methods/create-manifest.js", createShipment: "./methods/create-shipment.js", rateShipment: "./methods/rate-shipment.js", schedulePickup: "./methods/schedule-pickup.js", trackShipment: "./methods/track-shipment.js", deliveryServices: ["./definitions/example-delivery-service.json"], pickupServices: []}{ "id": "bd45f17d-e32f-43d0-b397-d627bf0dbfa5", "name": "@shipengine/cargo-inc", "description": "ShipEngine Connect application for cargo-inc carrier services.", "websiteURL": "https://example-carrier.com", "logo": "./logo.svg", "icon": "./icon.svg", "manifestLocations": "single_location", "manifestShipments": "explicit_shipments", "cancelPickups": "./methods/cancel-pickups.js", "cancelShipments": "./methods/cancel-shipments.js", "createManifest": "./methods/create-manifest.js", "createShipment": "./methods/create-shipment.js", "rateShipment": "./methods/rate-shipment.js", "schedulePickup": "./methods/schedule-pickup.js", "trackShipment": "./methods/track-shipment.js", "deliveryServices": ["./definitions/example-delivery-service.json"], "pickupServices": []}import { CarrierDefinition } from "@shipengine/connect";const carrier: CarrierDefinition = { id: "ed16921d-678b-4d07-9921-1447e1847c1c", name: "@shipengine/cargo-inc", description: "ShipEngine Connect application for cargo-inc carrier services.", websiteURL: "https://example-carrier.com", logo: "./logo.svg", icon: "./icon.svg", manifestLocations: "single_location", manifestShipments: "explicit_shipments", cancelPickups: import("./methods/cancel-pickups"), cancelShipments: import("./methods/cancel-shipments"), createManifest: import("./methods/create-manifest"), createShipment: import("./methods/create-shipment"), rateShipment: import("./methods/rate-shipment"), schedulePickup: import("./methods/schedule-pickup"), trackShipment: import("./methods/track-shipment"), deliveryServices: [import("./definitions/example-delivery-service")], pickupServices: [],};export default carrier;id: d94500ef-f81f-43ed-b4bb-e1fd8f150c7ename: "@shipengine/cargo-inc"description: "ShipEngine Connect application for cargo-inc carrier services."websiteURL: https://example-carrier.comlogo: ./logo.svgicon: ./icon.svgmanifestLocations: single_locationmanifestShipments: explicit_shipmentscancelPickups: ./methods/cancel-pickups.jscancelShipments: ./methods/cancel-shipments.jscreateManifest: ./methods/create-manifest.jscreateShipment: ./methods/create-shipment.jsrateShipment: ./methods/rate-shipment.jsschedulePickup: ./methods/schedule-pickup.jstrackShipment: ./methods/track-shipment.jsdeliveryServices: - ./definitions/example-delivery-service.yamlpickupServices: []Implement
Once you have generated the scaffolding for your application using ShipEngine Connect CLI, add your implementation for each method your application supports. Likewise, use the example service definition files to create unique definitions for each of the services your application provides. Finally, update the application definition to include all the methods and definitions you have implemented.
Test
As you're building your app, you'll want to run it periodically so you can test and debug your code. Luckily, ShipEngine Connect CLI includes commands to help with this,
such as connect start and connect test. You can also write your own unit tests to exercise your code. See our testing page for more information.
Publish
Once all the generated tests pass, you will publish your application to ShipEngine Connect using the connect publish command. This command will publish to a development environment where your application
will be reviewed and further end-to-end testing may be performed before your application is published to production and made available within our suite of e-commerce solutions.
Sample Application References
If you would like to see more examples of various ways to implement and structure your applications, please have a look at our sample app repo.